
How To Enable IMAP in Gmail
In this article we will take a look at how to enable IMAP in Gmail.
The process just takes a couple of minutes and enables you to use your favorite email client, like Outlook, with Gmail.
Most of us have several email addresses. We have our work email addresses and our personal email addresses. For example, you may have the address jdoe@yourcompany.com for work email use and you probably have a hotmail or Gmail account for personal use.
In this situation, most people use Outlook for their work email and then they have to go somewhere else to use their personal email account.
However, the technology called IMAP (get geeky with IMAP tech info here.) allows us to have our Gmail mail show up in our Outlook.
To accomplish this, the first thing that we need to do is enable IMAP in Gmail.
This will then enable us to use Gmail with our favorite email client and prevent us from having to visit several places to receive email from all of our various email clients.
In other words, after doing this, and then reading our Gmail Outlook article, you will be able to receive your Gmail mail within Outlook or the email client program of your choice.
To complete the following steps, you will need your Gmail account information handy. If you do not yet have a Gmail account, you may want to visit How To Get A Gmail Account before you begin this process.
How To Enable IMAP in Gmail: Step by Step
This article takes you through the process of setting up IMAP with Gmail. You can perform the steps as you read the article by opening Gmail in a new window and having both screens side by side.
This process just takes a couple of minutes.
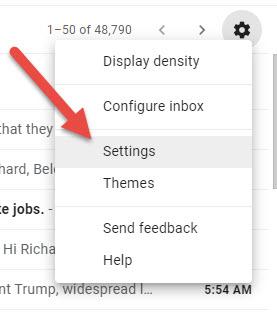
![]() One you are in Gmail Click, on the settings menu in the upper right corner of the screen as you see in the photo below:
One you are in Gmail Click, on the settings menu in the upper right corner of the screen as you see in the photo below:
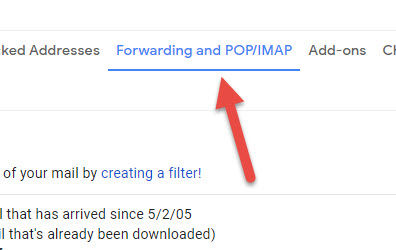
![]() In the next window, you want to choose “Forwarding and POP/IMAP” as you see in the depiction below:
In the next window, you want to choose “Forwarding and POP/IMAP” as you see in the depiction below:
![]() At this window, you only need to do one thing…and then you are done. Didn’t we tell you this was an easy process?
At this window, you only need to do one thing…and then you are done. Didn’t we tell you this was an easy process?
Look at the portion of the screen where it says IMAP access and select the choice that says, “Enable IMAP” as you see in the photo below:

![]() To complete the process, simply click the “Save Changes” button and you are all done!
To complete the process, simply click the “Save Changes” button and you are all done!
Enabling IMAP in Gmail: Summary
As you can see, it is very easy to learn How To Enable IMAP in Gmail.
This simple process provides great benefits to you as a user of Gmail: It allows you to access your Gmail account from your favorite email client like Microsoft Outlook. This saves you lots of time because you do not have to continually switch applications to see all of your various email accounts.
This article is part of our How To Google series where you can find many great articles including How to make money with Google Adsense!

Get your copy of his latest book entitled Obvious Conclusions, stories of a Midwestern emigrant influenced and corrupted by many years living in San Francisco and abroad. It just received its first outstanding review "...reminiscent of David Sedaris or Augusten Burroughs" on Amazon UK.
- How to use Google Translate [The Ultimate 2021 Guide!] - June 18, 2021
- How To Check Your American Express Gift Card Balance [2021 Updates] - June 18, 2021
- How to Use YouTube TV With a VPN [or abroad] - July 4, 2020